Konichiwa!

Hello...I am Dracula! I bid you velcome!
(....Well, one of those statements is not entirely true...)

Thank you for stopping by "noms4noobs", your source for gamer grub of many varieties! I wanted a place where I could play with my food before playing with the guild, and show others how to do so as well.
Ever watch an anime and see the cute little Bento (or "Obento") boxes and think, "I wish I could make one..."
Ever look at your dry, ten cent ramen and wonder, "I wish this looked like nommy ramen on TV..."
Do you struggle with having ten minutes or less to make a meal that is mess free for easy gaming?
Are you tired of having your LAN parties being more like LAME parties?
Wonder where to eat when you leave the house?
Then you, my nerdy and or geeky friend, are in luck because you can now has the cheezburger and so much more!
I also want all these things to be fixed, and want to fix few of these things as well! So with my limited sense of humor and clear sense of taste I welcome you to a place where you can read, watch, and learn how to be 0083|2 1337 instead of a |\|008 when it comes to noms~!
Showing posts with label eggs. Show all posts

Saturday, January 28, 2012

How to Cook: Ramen

When it comes to Ramen people think there is two kinds; The cook Ramen Shop kind, and the gross (in comparison) one you make as home in the microwave when there is nothing else to eat.

But, I say that there is a third! It is the in-between Ramen. You make it at home in a short amount of time, and it tastes very good as well. I have pretty much always been a particular eater when it comes to ramen. I like it to be flavorful, the noodles to not be mushy, and the broth to not taste...starchy. So I came up with a method to make tasty, quick ramen for all of my MSG cravings!


You will need:

- A Pot with a Lid
- A Frying Pan
- A Fork and Chopsticks
- A Bowl for your Ramen


Ingredients:

- Ramen packs (depending on amount of people)
- Olive Oil
- 1 Egg (per person)
- Vegetable of Choice (Squash, Pumpkin, Soy Beans, Greens, mixed veggies, etc. Whatever you like best and have available. )
- Soy Sauce, Meme Sauce (optional), Seasoned Salt (or salt and pepper)
- Meat of choice - Shrimp, beef, chicken, etc. (optional)
- Kimchi or Hot Sauce (optional, for wimps)
- Seasoned Nori Strips (optional)

When it comes to cooking your ramen "fillings" there are many options. I like to have squash, soy beans, or some frozen mixed vegetables in mine. I will use left over meat bits, or thaw some shrimp at times as well. I always try to have egg with it, and I love to put Kimchi and the spicy liquid from Kimchi in mine.


First, fill the pot with water, about an inch from the top, cover it and place on a burner on Med-High.


The way that you make this quickly is that while the water is boiling you cook everything else needed, this also helps for people who have patience issues, when it comes to food, and stare at the pan the whole time (like myself). 


Get out the ramen packs you want to make and take out the solid squares and the packets, leaving the little scrap noodles in the wrappers. Then, set the noodles on top of the package, to keep it clean.


Like so.


(I am cooking for 3 people, with all these fillings you only really need one pack per person.)


Next, take the vegetables you want to put in the ramen and get them chopped or thawed. Take your frying pan and add about a Tablespoon each of Oil, Soy Sauce, and Meme (if you have it), and add about 1/2 Teaspoon Season Salt (or salt and pepper), and if applicable other seasonings you like.


 These are my favorite flavorings, they go well with the ramen so that the taste will "blend" when they are added together. 


(Yin-Yang?)


Coat the vegetables evenly with the liquid and cook them until tender. (I was making ramen for 3, once again, so there is a lot in my pan.)


Once the vegetables are finished, add the meat to the pan (add more of the sauce mixture if needed) and cook until hot, for leftovers, or...cooked, for raw.


Meanwhile, be keeping an eye on the water. Once it is at a rolling, rapid boil, add the noodles and be stirring apart with a fork (or chopsticks).


Keep the lid off, you are about to use it.


Stir them apart and keep the water on high, the water can stir them itself sometimes if the boil is right.


Add oil to the frying pan and crack your egg(or eggs) into it. Take the lid and "dome" the egg, this cooks it faster and gives an almost poached taste to the top of the fried egg (I called it "Froa-ched").

Once it has cooked a bit add some salt and Soy Sauce to the top, and cover again. Once it is cooked how you like it your noodles should be done!!


As for the noodles, they should be slightly undercooked. You want some chew to them still. Once they are a slight translucent color dump the water, and leave a little so they do not stick.


Now to construct the ramen!

Take out the amount of bowls as needed and empty one sauce packet into each. Add a sprinkle of Soy and Salt to each.


 (If you do not like the sauce packets, use 1/2 Teaspoon Bouillon instead.)


Add desired amount of Hot Water to the bowl. You can microwave it or heat it with a kettle, but I just go for the hottest degree of tap water (it's clean, I live in Colorado). The noodles will also heat the soup.

Stir it up!


Take the Nori, cut it into thin strips, and mix in the soup.


Take your Kinchi (or desired spicy sauce), for those of us who can handle the heat! Add that to the soup.


Do not add it if you are a wimp, and will breath fire like bowser if you add spice to it!


Add the Vegetables and stir.


Add the noodles and flip it all together. If you would like to add anything else, do that now.


Last, and certainly not least, add the egg to the top of the ramen, like a tasty crown!


And, Presto! Delicious ramen! 


Now, sit back, and enjoy your ramen! It is so much fun to tell people you are "just making ramen", and then put this in front of them! You will look pretty fancy! 


Enjoying the Noms of their labor, 
-C.A.M.

Tuesday, January 3, 2012

How to Cook: French Toast


French toast, which never really was French, is one of the simplest Breakfast meals to make. Because it is simple ingredients, it is pretty easy to mess it up.

So today we will be going over the basics for this, like beginner mode on a game, so that people who are new to cooking can be able to make it.


Rule number 1!

When cooking eggs use WATER and not MILK!

When you cook eggs with milk then they have a tendency to burn, you only want to use milk in the eggs for certain recipes, like custards.

This may be French Toast, but the main ingredients are eggs and bread, so you need the eggs to be right.


This Recipe is for 4 slices of French Toast.

You will need:

The Bath

- Medium bowl
- Whisk or fork
- Tupperware or large bowl to soak bread in
- 4 Eggs
- 4 Slices of bread
- 1/2 Cup Water
- 1 Teaspoon Nutmeg
- 1/2 Tablespoon Cinnamon
- 1 Tablespoon Brown Sugar
- 1 Tablespoon White Sugar

For Cooking

- Frying Pan
- Butter to coat it
- Cinnamon sugar (optional, but recommended)


The Extras

- 1 Banana (optional)
- Cinnamon sugar, powdered sugar, and syrup to taste.


Rule number 2!

When you are using the bread you will either need stale bread or toasted bread!
One of the main reasons people make French Toast when having company over is because the best bread is the stale, old, bread you buy from the store which is usually on sale.

If you cannot buy that type of bread you will need to toast it. If you do not the bread will be mushy and fall apart and be nasty! Having your breakfast resemble the Phlegmoids from the old Chex Mix game is never appealing...


So get it nice and brown and crunchy before dipping.


Next you need to heat up a pan with butter in it and put that on Medium-High.


Now you will be getting your egg bath ready for the crunchy bread.


Crack the eggs into the bowl and mix them. The best way is to poke the yolks and then stir vigorously, like a Wii game, until they are fluffy. Next, add the cold water (about 2 Tablespoons per. egg, also it's 1 egg per slice).


Mix that in well and add the sugars and spices.


Soak the bread in the bath for 1-2 minutes.

Once the bread is filled with the liquid drop the slices into the pan.


Cook for about one minute and flip.


Add Cinnamon Sugar to the side and, after a minute, flip again. Continue this process until the egg looks completely cooked (About 3-4 times).

If you do not know what "Cinnamon Sugar" is, it is pretty self explanatory and obvious really... They sell this pre-made, but I have it made at home and put in a shaker.
(1 part cinnamon and 2 parts white sugar and mix.)


Remove from the pan and serve however you would like!


I like a bit of powdered sugar, sliced banana, and syrup on mine!


With that you should be able to enjoy a nice, fast, and enjoyable breakfast! It has eggs, fruit, and bread, what more do you need?

You have now passed beginner mode, aka "I am only interested in the story and not the challenge and bonus ending" mode. Master that, and more fun things are possible!

Enjoying the noms of their labor,
-C.A.M.

Friday, November 18, 2011

How To Cook: Bunny in a Hole


"Toad in a Hole" was one of my favorite things to eat for breakfast growing up, it was one of the easiest and tastiest things to make. So I chose to take this and add some zest to it! So since my nickname is "Little Bunny/Bunny Bunny" I added a twist and changed the name. Hopefully you will also find this easy to make. So let's get it on like Donkey Kong!


What you will need for each serving/slice is
1 Slice of toast
1 Egg
1 Piece of ham (Canadian Bacon, Bacon, Lunch Meat, Whatever)
Shredded Cheese

If you also want Hollandaise Sauce with it (I highly recommend it)
Per serving you will need
1 Egg yolk
2 Tablespoons butter
1/4-1/2 Tablespoon Lemon Juice
A couple drops of that sauce you cannot pronounce (Worcestershire)
1 Teaspoon crushed and dried Parsley


You want a good non-stick pan for this because if you do not then the egg will stick and pop out of the bread like Punxsutawney Phil on Groundhogs day! We want a yummy "sunshine sandwich" not 6 more weeks of winter!

Heat that pan to Medium-Low

Butter the bread on both sides. Then take the bread and cut out the middle with a biscuit cutter, knife, or glass. I like to keep the centers of the bread and toast them.

Put the bread in the pan and crack the egg into the middle of the bread.


Once you see that the white is solid on the other side flip it over and let the other side cook.


The egg should be cooked to how you like it (I like a mostly cooked yolk) and the bread should be lightly toasted.

Keep an eye on it so that the bread does not burn.


You can do however many you want, I cooked two pieces when I made it.


Stack your toast how you would like it.


Heat up the ham how you would like it, about 10 seconds in the microwave works.

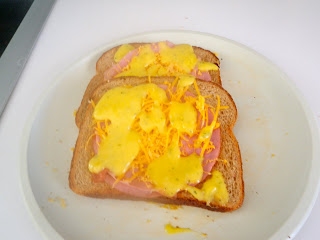
Add that to the top of your toast.

Shred your cheese on the top and you can eat it just like that.


OR

You can make Hollandaise sauce for the top!

People seem to make a big deal about this but it is one of the easiest things to make once I learned how.

Separate your egg/eggs. Whenever I use egg yolks I will put the whites in a container in the fridge and next time I make scrambled eggs add it to that. Basically, I hate to waste food.

Mix the egg with the Lemon juice, parsley, and Worcestershire sauce.

In a separate bowl melt the butter, take a few seconds in the microwave. For the lemon juice you add either 1/4-1/2 Tablespoon to it per egg. I like mine more acidic to cut the rich taste of the dish.

Then slowly add the hot butter to the egg mixture and serve.

Something to know with this is to make sure the butter is hot! Because you cannot reheat this sauce, then the eggs will cook.


Drizzle that on top of the bread.


I wanted to make something more more fun with this so I took the toasted centers from the bread and used some cookie cutters to get some shapes out of them. I chose bunnies, of course.


It came out looking like this.


Not to brag....But this tastes freaking delicious! I crave it so much since I made it and as I write this I am tempted to make another piece in the kitchen.

I hope you enjoy this and have fun cooking!

Enjoying the noms of their labor,
-C.A.M.

p.s.
My dog, Baron Von Joby, also enjoyed the little cut out not in the picture there (if you were wondering why there was only one bunny cut out on the side)