Konichiwa!

Hello...I am Dracula! I bid you velcome!
(....Well, one of those statements is not entirely true...)

Thank you for stopping by "noms4noobs", your source for gamer grub of many varieties! I wanted a place where I could play with my food before playing with the guild, and show others how to do so as well.
Ever watch an anime and see the cute little Bento (or "Obento") boxes and think, "I wish I could make one..."
Ever look at your dry, ten cent ramen and wonder, "I wish this looked like nommy ramen on TV..."
Do you struggle with having ten minutes or less to make a meal that is mess free for easy gaming?
Are you tired of having your LAN parties being more like LAME parties?
Wonder where to eat when you leave the house?
Then you, my nerdy and or geeky friend, are in luck because you can now has the cheezburger and so much more!
I also want all these things to be fixed, and want to fix few of these things as well! So with my limited sense of humor and clear sense of taste I welcome you to a place where you can read, watch, and learn how to be 0083|2 1337 instead of a |\|008 when it comes to noms~!

Monday, December 19, 2011

Fish and Bunny Shaped Dumplings


Sure, there are a lot of ways to use leftovers, but I have found a way to use them in a more...unique kind of way! You can make these dumplings with leftovers or new ingredients, it's really up to you in the end. I had leftover wonton wrappers from Thanksgiving and since I have always wanted to try making dumplings (or Pot Stickers") shaped like a fish I decided to try! Then I thought, "Might as well teach others how to do it...If it's successful."


Well it was, as successful and exciting as finally beating a Final Fantasy game after logging about 200 hours! So let's get started!

You will need:

-Wonton Wrappers
-A Frying pan with oil
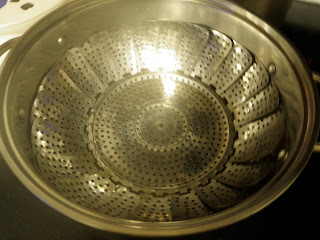
-A large pot with a lid and a steamer (anything you can use to steam these with)
-A Medium sized bowl for filling
-A Cutting board
-A Sharp Knife
-An Egg and some water (for egg wash)

Filling for 12-16 Dumplings

- 1 Cup of any type of meat, canned or leftover (I used chicken, feel free to use whatever you want)
- 3 Cloves Garlic
- 2 Tablespoons Onion or 2-3 Shallots
- 1 Tablespoon fresh Ginger (optional, but preferred)
- 1/4 Cup each Vegetables (Carrot, Celery, Soy Beans, Peas, etc.)
-A round green vegetable for the eyes (soy beans or peas)
- 1-2 Tablespoons each of any combination of sauces you have (Soy sauce, Worcestershire, Meme, Ponzu, and Sriracha if you like spicy food)

Potstickers are like pizza, you can put whatever you like in them as long as you like it and it makes at least a little sense. These are things that I like so if you like different things then you can enjoy those instead.

Fill a large pot with water and a bit of salt and Soy Sauce. You want just a little bit of water to steam and not boil the dumplings, so the water level needs to be about a centimeter below the steamer. Put the steamer on top, set to Medium-Low heat, and cover.


While you are cooking, if it is for a long time, you want to keep refreshing the water level so that the water does not run out and burn into the pan. I would say to add about 1/4 cup every 20 minutes or so once the water is boiling.

If you do not have a way to steam these you can try just microwaving them for about 5-10 minutes (until the skins are becoming clear) with a little bit of water, covered somehow. But I do not really recommend that method...

Prep your frying pan with the oil, but do not turn it on until you set the first round of dumplings in the steamer.

You want to mince your garlic onion, and ginger very fine, press it if possible.


Next mince the vegetables of your choice. I would say that you can put in the Peas or Soybeans you will be using for the eyes, so as not to waste them. You can also buy a pack of frozen chopped vegetables and thaw them, that will also work. Then you can take the peas out for as many fish and/or bunnies you plan to make.


Add those to the bowl with the Garlic, Onion, and Ginger.


Next mince up your meat or open the can. I advise you to not use...I really do not see that ending too well... If you are not using meat then you will obviously skip this step.


Next, add the sauces you have to taste. I used Meme, Soy Sauce, and Worcestershire (I hate spelling that word SO much!).


Mix that all up and get ready to stuff some dumplings!


Next mix up some egg wash in a small bowl. Mix the egg with a splash of water and you're done!


Add a spoonful of the filling to each wrapper right in the middle.


Depending on how fat you want your animals is how much you want to add.

Apply the egg wash around the whole wrapper.


Now the rest depends on what you want to make!

~Fish~

Seal the dumpling right in the middle making a ridge sticking up, like a fin, leaving the ends unsealed.


Seal one end completely flat.

Then pinch it down the middle to form the tail.


Next you want to seal the dough together but not flat like the other end, leaving the middle open. Like this:


Use your fingertips to form the eyes by sticking one or two inside and then pinching down in-between.


They should look a like this in the end.


This is where the "eyes" are going to go.


~Bunny~

Fill and seal the middle like you do on the fish, but press down the ridge so that your bunny has no dorsal fin...


Flatten the end, again like the fish, and then fold the ends on each other to form a triangle.


Flatten down the other end, but have the folds be slightly apart from each other, so it comes out more like a triangle than a square. You want a space in between the "ears"


Then fold the section up and against the middle and form the ears to your liking.


They should look like this.


Next press little divots under the ears so the eyes have a place to stick into.


~Regular~

If you are boring you can just seal the whole thing along the top and make them "normal".


To Cook

Place your dumplings in the steamer 2-5 at a time and cook covered for about 5 minutes, or until the skins are a little translucent.


Turn on the frying pan while these are cooking.


Then fry the bottoms until golden brown and crispy, about 3-5 minutes depending on how how the pan is.


For the Bunny dumplings you want to hold the ears up after they are steamed and they are in the pan, so they do not stick to the body.


You probably want long chopsticks so you do not get burned....


Once they are cooked remove them from the pan (duh) and add the eyes.

Like I said before, any round vegetable will work, green works well.


These are both Kawaii and Oishii!!

(....Cute and Delicious....)

Repeat until you run out of filling, wrappers, or time!


And there you have it! Shaped, or unshaped for weirdos, dumplings!

I hope you enjoy!

Enjoying the noms of their labor,
-C.A.M.

Monday, December 5, 2011

How to Cook: Coffee Syrups/Lattes


The winter season is the time where all of your money disappears, hence why it is called "Magical", right?
I kid you, I love Christmas, Thanksgiving, New Years, "The Holidays", etc. Though most of my does money goes to gifts and hot drinks and soups. . .


A great way to save is to make your own coffee at home so you are not as tempted to spend it on Starbucks. Let's face it, we have all had a tea or coffee from that place. So how will you afford to buy all the awesome gifts for your family and friends this year if you are spending about $5 or more a day on drinks alone? Now you can't buy them the Han Solo Ice cube Tray, nerdy shirts, or new expansions to World of Warcraft and other games! Oh, the horror!
To help you with this problem, since I can't give out my own money (or lack-there-of)to you, I will help you make your own delicious drinks so you can save your own!


For this recipe you basically make a simple syrup and add the flavor you want to that.

Simple Syrup

What you will need:
-3/4 Cup White Sugar
-1 Cup Water
-Saucepan

You will also need an airtight sealable container, like a jar or Tupperware, and something to strain with, cheese cloth works the best. You can try a coffee filter, but that will take about 10 hours to do and will rip at the slightest bit pressure, trust me that you will want a cheesecloth or fine strainer instead.

I made three kinds of syrups when I did this.


Pumpkin Spice, Chocolate, and Peppermint/Candy Cane.


The pumpkin spice was inspired by Sugar Crafter, I tweaked it a bit but give her the credit for it, the others I made on my own.

You will add these ingredients to the Simple Syrup depending on what you want. You can add the ingredients depending on how strong you want it to taste, keep in mind it is supposed to be a concentrated syrup though.

Pumpkin Spice

- 1 1/2 Tablespoons Pumpkin Pie Filling
- A dash of Cinnamon, Clove, and Nutmeg
or

-1 1/2 Tablespoons Pumpkin Puree
- 2 Teaspoons Cinnamon
- 1/4 Teaspoon Clove
- 1 Teaspoon Nutmeg

Chocolate

- 3-4 Tablespoons Cocoa Powder
- 1 Teaspoon ground Chocolate
(I used a cocoa with ground chocolate in it already)
- 1 Extra Tablespoon Sugar
- 1/2 Teaspoon Vanilla Extract

Peppermint/Candy Cane

- 1-2 Teaspoons Mint Extract
- 3 Teaspoons Candy Cane Candies
(Any type of candy that is flavored like peppermint/candy cane will do)


Directions

Add all of your ingredients to the sauce pan and set the burner on Medium-Low heat. Simmer the mixture. Do not let it boil or the sugar may burn. Continue stirring it for about 15 minutes, or until the sugar is integrated completely. We do not want any floating, undissolved sugar lingering at the bottom of the pan like treasure on the sea floor.

Turn off the heat and let the syrup set for a few minutes off of the burner. While that is sitting get out the strainer and secure it on your container.

Slowly pour your syrup through the container and let it drain into the jar. You will probably need to scrape the residue, aka reason for straining, off so that the syrup drains faster and does not clog.

Seal the container, as it sits it will get thicker. You can store this for about a month in the refrigerator.


The best way to prepare this is in a "Latte", which is really just Milk and a few shots of expresso or Strong Coffee. The weaker your coffee, the less milk you want to use.

I could not steam the milk, (if you can then great!) so instead I heated the milk, not letting it boil, and added it to the coffee. I used 2 shots of expresso and filled the rest of the mug with milk.

Then add about 2 Tablespoons of your syrup. Or more depending on how strong you want it to taste.

You can even make a Peppermint Mocha with the chocolate and peppermint combined, at least that's why I made those two.

Add Whipped Cream or some Frothy Milk to the top, if you have some, and enjoy!


You can even put it in a travel mug or those types that look like the cups they give you in Coffee Shops if you would like!


This is a great thing to make for yourself, to impress company, etc.

Really you can make any kind that you want to, just add what you like to the Simple Syrup and follow the instructions.

Also, if you are really trying to save money this year, not only can you make these to save for Christmas gifts but you can give it as a gift! Wowie!


Enjoying the noms of their labor,
-C.A.M.

Friday, November 18, 2011

How To Cook: Bunny in a Hole


"Toad in a Hole" was one of my favorite things to eat for breakfast growing up, it was one of the easiest and tastiest things to make. So I chose to take this and add some zest to it! So since my nickname is "Little Bunny/Bunny Bunny" I added a twist and changed the name. Hopefully you will also find this easy to make. So let's get it on like Donkey Kong!


What you will need for each serving/slice is
1 Slice of toast
1 Egg
1 Piece of ham (Canadian Bacon, Bacon, Lunch Meat, Whatever)
Shredded Cheese

If you also want Hollandaise Sauce with it (I highly recommend it)
Per serving you will need
1 Egg yolk
2 Tablespoons butter
1/4-1/2 Tablespoon Lemon Juice
A couple drops of that sauce you cannot pronounce (Worcestershire)
1 Teaspoon crushed and dried Parsley


You want a good non-stick pan for this because if you do not then the egg will stick and pop out of the bread like Punxsutawney Phil on Groundhogs day! We want a yummy "sunshine sandwich" not 6 more weeks of winter!

Heat that pan to Medium-Low

Butter the bread on both sides. Then take the bread and cut out the middle with a biscuit cutter, knife, or glass. I like to keep the centers of the bread and toast them.

Put the bread in the pan and crack the egg into the middle of the bread.


Once you see that the white is solid on the other side flip it over and let the other side cook.


The egg should be cooked to how you like it (I like a mostly cooked yolk) and the bread should be lightly toasted.

Keep an eye on it so that the bread does not burn.


You can do however many you want, I cooked two pieces when I made it.


Stack your toast how you would like it.


Heat up the ham how you would like it, about 10 seconds in the microwave works.

Add that to the top of your toast.

Shred your cheese on the top and you can eat it just like that.


OR

You can make Hollandaise sauce for the top!

People seem to make a big deal about this but it is one of the easiest things to make once I learned how.

Separate your egg/eggs. Whenever I use egg yolks I will put the whites in a container in the fridge and next time I make scrambled eggs add it to that. Basically, I hate to waste food.

Mix the egg with the Lemon juice, parsley, and Worcestershire sauce.

In a separate bowl melt the butter, take a few seconds in the microwave. For the lemon juice you add either 1/4-1/2 Tablespoon to it per egg. I like mine more acidic to cut the rich taste of the dish.

Then slowly add the hot butter to the egg mixture and serve.

Something to know with this is to make sure the butter is hot! Because you cannot reheat this sauce, then the eggs will cook.


Drizzle that on top of the bread.


I wanted to make something more more fun with this so I took the toasted centers from the bread and used some cookie cutters to get some shapes out of them. I chose bunnies, of course.


It came out looking like this.


Not to brag....But this tastes freaking delicious! I crave it so much since I made it and as I write this I am tempted to make another piece in the kitchen.

I hope you enjoy this and have fun cooking!

Enjoying the noms of their labor,
-C.A.M.

p.s.
My dog, Baron Von Joby, also enjoyed the little cut out not in the picture there (if you were wondering why there was only one bunny cut out on the side)